Are you one of “those people” that see a fabric and think, this would be fabulous as a shirt / pants / bag etc. and only later on when you are ready to work on the project start looking for that perfect pattern?
Do you then find yourself wondering well how much fabric should I buy? You don’t want to not have enough and then try and get more of the same fabric. And you don’t want to buy too much especially when it’s a very expensive fabric.
What do you do? You use these wonderful “How Much Fabric?” Reference Cards and no more rough guessing and oops I should have later on.
***********************************
Want a chance to win a “How Much Fabric?” Reference Card Set?
Like Arts And Crafts Plaza on facebook www.facebook.com/ArtsAndCraftsPlaza
Like Gwyn Hug on facebook www.facebook.com/pages/Gwyn-Hug/282217611789610
Put a comment on this post and be entered to win a “How Much Fabric?” Reference Card Set from the complete collection of your choice.
Open to everyone, Gwyn Hug will ship internationally
Winner will be randomly selected January 16th 2012!
Winner will be contacted though facebook.
Winner announced January 17th 2012.
***********************************
The Original “How Much Fabric?” Reference Card Sets –
www.gwynhug.com
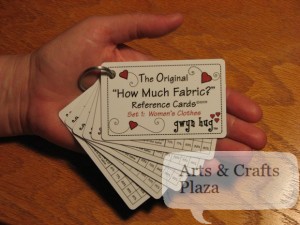
There are currently several types of cards available with more to come.
KNOW HOW MUCH FABRIC TO BUY, WITHOUT A PATTERN IN HAND!
Currently Available:
Set 1: Women’s Clothes (6-22/Eur 32-48)
Set 2: Plus Sizes (18-32/Eur 44-58)
Set 3: Men’s Clothes (34-50/Eur 44-60)
Set 4: Babies and Toddlers (Newborn – 6)
Set 5: Children’s (7-16)
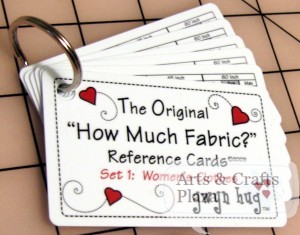
What you can expect to get in the mail is a plastic card, size: 3⅜” x 2⅛” same size as your credit card.
Each set comes with several cards on a ring. Each card has a specific type of clothing.
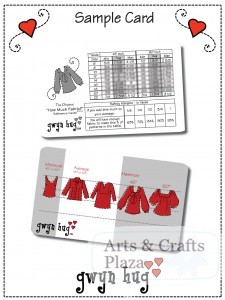
The front of the card has the minimum, average and maximum fabric requirements by clothes size and fabric width as well as the “Safety Margin” table that helps you round up.
The back of the card has designs of clothing that will help you determine the type of outfit
Gwendolyn Campbell is the creative genius behind these cards. Gwen is an avid sewer. You can check out her blog at After the dress
Gwen and her friend Christine looked at over 2,000 patterns in order to create a single set of cards.
With the help of Beth, a graphic designer, they created the cards.
Another friend, Susan is responsible for the site.
What a creative and resourceful bunch, you go girls!
On the FAQ page you can find all the answers you need.
Some of the questions that you can find answers to are:
How do you use the “How Much Fabric?” tables?
Can I buy just one card, instead of the whole set?
Do I need a Paypal account to buy the cards?
I see you have some pages in other languages. Why not my native language?
Should you have any questions, or ideas, have other sets of cards you would love.
Do you speak a language that hasn’t been translated yet?
You can even find a short Klingon translation.
Contact Gwen on the contact page or email directly gwynhug@gmail.com.
Gwyn Hug
P.O. Box 90576
Lakeland, Florida 33804-0576
A look behind the curtain, how did it all start? What is involved in creating these cards?
You know those times when you unexpectedly run across a beautiful, must-have fabric, but don’t have the right sewing pattern immediately available and so you aren’t sure how much to buy? And you want to make sure that you buy enough, but you don’t want to buy too much either… Well, that used to drive me crazy!
A couple of years ago, I finally decided to come up with a solution for this problem. My day-job involves analyzing a lot of data and so I realized that I didn’t have to guess how much fabric the “typical” skirt pattern (for example) calls for – I could actually get the data and calculate it!
I started with my own substantial stash of patterns – typing those tables on the back of each pattern envelope into a spread sheet-so that I could calculate the averages. Before I knew it, I was searching the internet and downloading the pattern envelope images from hundreds, and then thousands, of patterns…
And the result of all that data entry and analysis – The Original “How Much Fabric?” Reference Cards! These are small, sturdy plastic reference cards that slip easily into your purse. There are sets that cover clothes for women, men, babies, toddlers and children. Each set has cards for different types of garments – tops, pants, jackets, dresses etc. Each card has a table that presents the minimum, average and maximum fabric requirements broken down by fabric width and garment size. Each card also has sketches to help you visualize what type of garment could be made with the minimum, average and maximum amounts of fabric.
They are the perfect “notion” for fabric shopping! You’ll be able to shop with confidence, knowing that you are buying enough fabric, but not buying too much and wasting your money.
What can you tell me about your hobbies and favorite thing you do?
My day-job is in research – so I design experiments, analyze data and write reports. My hobby is sewing – it’s such a nice contrast to my day-job. I get to work with my hands and I’m surrounded by beautiful colors and textures and patterns. My sewing projects only take a few hours or days – not years, like my research projects. I have a concrete product when I’m done – something I can hold in my hands, show to someone else, and put into practical use right away.
I love sewing for family and friends – letting people pick a fabric that speaks to them and turning it into something that becomes a part of their lives. I originally came up with “Gwyn Hug” as my sewing label. It has 2 meanings that make it the perfect finishing touch on the clothes that I make for the people I love. First, it brings to mind the thought that when they put on my garment, it’s like I am wrapping them up in a hug. Second, in Welsh (my ancestry), it roughly translates to “a blessed cloak.” (And by “roughly” I mean you have to refer to like the 19th possible translation/definition for each word…) Okay, it’s a stretch, but isn’t it a wonderful image?
What crafting skill do you wish you had?
So, this may seem a bit extreme – but a few years ago I bought a used floor loom and I am in the process of teaching myself how to weave! Did you know that women have been weaving in some form or another for about 10,000 years! Not only that, but the first computers were modeled after early looms! How cool is that? I love the feeling of connection to women through all of history when I weave. And I love the way weaving combines creativity and art and math (weave patterns can be defined by sequences of binary vectors). My ultimate goal is to sew garments with fabric that I have woven.
How has opening your shop affected your life?
I guess the best thing about opening up my shop is the wonderful people that I have “met” – from all around the world! One of my customers is a fashion designer from South Africa, about to launch a line of clothing. I’ve learned about a 400 year old fabric market in the Netherlands. I met an Australian “minist” – someone who owns an original Mini auto mobile – she even sent me a picture in which she is posing by her Mini panel van. I could go on and on – I’ve just met so many really wonderful people!
What was your experience of having your first sale ever?
I announced the opening of my store in a post on my blog, and my first sale came within 30 minutes of my post going up. I was so jazzed! I thought it signaled the opening of flood gates! Of course, my second sale didn’t come until several days later… 😉
Give me some insight on you personally, do you give back to your community in some way?
I have been doing volunteer tutoring of some form or another for the last 11 years. I started as a Laubach adult literacy tutor and had three wonderful students across a 6 – year span. Then I stumbled into the opportunity to (volunteer) teach sewing to some young immigrants who didn’t speak English. That was quite a challenge for all of us! (I didn’t speak any Spanish at the time.) I’m sure those first few lessons would have looked comical to an outsider – there were many times when we were all at a loss and just stared at each other helplessly… But we all persevered, they learned the basics of sewing, I learned some broken Spanish and we all became good friends.
That experience got me connected into our local immigrant community and for the last 3 years I have been (volunteer) teaching “ESL” (English as a Second Language) at a local church. Through all of this, I have met some truly amazing and inspiring people and made life – long friends. I hope that I have helped others to have a better life in some way – but I know for sure that my life has been enriched!
Where else can we find out more about you and your creations?
I have a personal (mostly sewing-related) blog http://aftertheDRESS.blogspot.com
Facebook page for Gwyn Hug www.Facebook.com/GwynHug
***********************************
Want a chance to win a “How Much Fabric?” Reference Card Set?
Like Arts And Crafts Plaza on facebook www.facebook.com/ArtsAndCraftsPlaza
Like Gwyn Hug on facebook www.facebook.com/pages/Gwyn-Hug/282217611789610
Put a comment on this post and be entered to win a “How Much Fabric?” Reference Card Set from the complete collection of your choice.
Open to everyone, Gwyn Hug will ship internationally
Winner will be randomly selected January 16th 2012!
Winner will be contacted though facebook.
Winner announced January 17th 2012.
***********************************
Happy sewing everyone!
Let’s create something!



Recent Comments